My life was recently improved by the addition of a border collie to our household. And if there’s one thing everyone knows about border collies? That they’re smart? Energetic? A bit insane? Sure, all true, but also that they rock a bandana!
The really good news about creating these bandanas is they’re not an exact science, and they don’t take long. So don’t overthink it, just give it a go and see how it goes! For convenience I suggest creating a paper pattern early which you can adjust with each subsequent bandana that you make.
I will attempt to update this article with some helpful photos when I make another bandana, but for now these are basically my notes. And if someone can make sense of them, that’s great I guess!
How to create your own dog bandana
You’ll need some fabric – for a border collie puppy a fat quarter is plenty, but if you have a large dog you might need more. Quilting weight cottons are probably the best choice here.
You may also want to add some medium interfacing, such as Vilene F220.
There are 3 things you need to measure first:
- The width of your dog’s collar
- The total length of your dog’s collar when flat
- How long you want the bandana to be (hold up some bits of fabric to see how they look and note down the measurement that you want for the total height of the bandana from the top of the collar to the tip of the bandana)
Grab some paper, a pencil and a ruler (a see-through quilting ruler is very useful for this) and use these measurements to draw your pattern.
Drawing the pattern
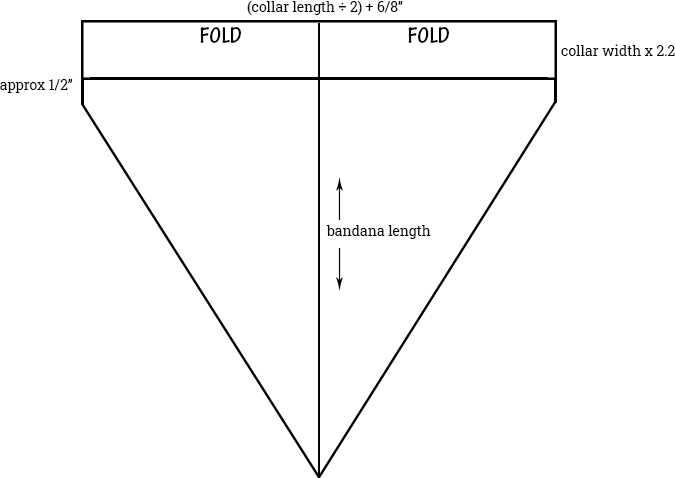
First let’s deal with the collar width. This determines how thick we need to make the little tube at the top of the bandana so we can feed the collar through. For a 5/8″ collar, 1 3/8″ is just about large enough to fit the collar’s hardware (buckles, etc) through without too much difficulty. So I’d recommend allowing 2.2 times the width of your collar for this section. You may want to test this out first if you have a particularly bulky collar to feed through, by folding a piece of fabric and sewing it to make a casing that wide and seeing if the bulky parts of the collar fit through. Whatever the resulting measurement is, we’ll call it A – in my case it’s 1 3/8″
Now take half of your collar length measurement and add 3/4″, we’ll call this B. Draw a rectangle on your paper with a width of B and a height of A.
Measure the long side of the rectangle, and mark the halfway point. Draw a vertical line down from here, which is as long as your third measurement, plus 1/4″.
Last step. From the sides of your rectangle, extend them down an extra 1/2″. Then, join these lines to the end of your central line.
That’s it! Cut it out, this is your pattern. Write “FOLD” at the top edge of it just to remind you how to use it. When you’re finished your pattern will look a bit like the below
Optional: Interfacing
If your fabric is thin, you may want to add a single layer of fusible interfacing. To make a pattern for this, copy your first pattern, remove the rectangle, then take off 3/8″ from the straight edges at the left and right (not the top) and take 1/4″ off the diagonal edges. See the diagram below for reference – the black lines are your new interfacing pattern, and the grey are your fabric pattern.

Cutting
Now, cut out your fabric. Fold your fabric horizontally and line up your “FOLD” side of your pattern to the folded edge. Pin it all around and cut it out. If your fabric has a large print, make sure you’re happy with the part of the print which is on your bandana.
Open out your fabric and press out any creases.
If you’re using interfacing, attach it now to the reverse side of one half of the bandana, centring it.
Fold in the straight left and right vertical edges (not the diagonal sides) by 3/8″, press and pin in place. Stitch along each edge 1/4″ from the folded edge.
Fold your fabric in half right sides together. Starting from the horizontal line on your fabric, stitch all around the edge with a 1/4″ seam allowance until you reach the horizontal line again, pivoting with the needle in the fabric at each corner. This means that you’re leaving your original rectangle open at both sides.
Trim the edges a little (I used pinking shears to trim mine) and trim the point close to the stitching line to make it easier to turn it through to neat point
Turn the fabric right side out through one of the open edges and push out the corners, then press. I have a neat little tool for pushing the corners out neatly – a Prym corner and edge shaper. You can also use your scissors but be careful not to damage the fabric, or a knitting needle.
You can finish your bandana in one of two ways, depending on the style of your fabric and your personal preference.
The first option is to simply stitch all the way across where the horizontal line is on your pattern.
The second option is to stitch that horizontal line, starting 1/8″ in, then pivot 1/8″ from the end and edgestitch 1/8″ from the edge around the point of the bandana, until you reach your starting point again. Be aware that you may struggle to feed the fabric through away from the point of the bandana, so it might be easier to stop at the point and sew the other half from the other side towards the point again.
Either option leaves an opening at each edge on the top of the bandana which you can slide your pup’s collar through. So finally, pop your dog’s collar off, feed it through the bandana, and put it back on, then tell your dog how great they look.
Recent Comments